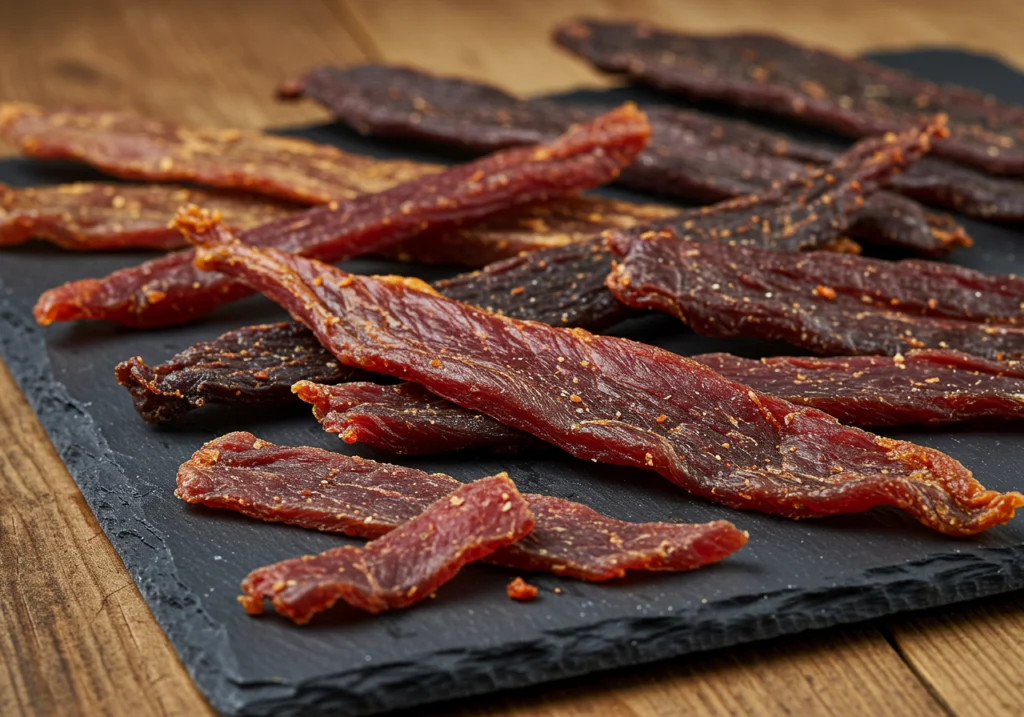
5 Best Beef Jerky Recipes: From Classic to Spicy Korean BBQ
Last weekend, my teenage son announced he was “going keto” (this week’s phase, apparently), and suddenly my stash of homemade beef jerky became the most valuable commodity in our house. I caught him trying to sneak an entire batch into his backpack at 11 PM! That’s when I knew I’d finally cracked the code on making jerky that rivals – no, beats – the $12-per-bag stuff at the gas station.
When it comes to high-protein, flavorful snacks that are both satisfying and portable, nothing beats homemade beef jerky recipes. And honestly? Once you realize how easy it is to make and how much money you’ll save, you’ll wonder why you ever bought those sad, overpriced meat strips at the store. My first attempt at beef jerky was… let’s just say the dog was very happy. But five years and probably 200 batches later, I’ve got this down to a science that even my picky brother-in-law admits is “actually pretty good” (high praise from him).
Unlike store-bought options that often contain excess sodium, sugar, and preservatives you can’t even pronounce, making jerky at home lets you control everything. Want it less salty? Done. Prefer it sweeter? Easy. Trying to avoid soy? No problem. From smoky and savory to spicy and sweet, beef jerky can be customized to suit any taste preference, making it a favorite for hikers, athletes, and busy families alike. Plus, when you tell people you make your own jerky, they look at you like you’re some kind of wilderness survival expert. I don’t correct them.
Choosing Your Beef: The Foundation of Great Jerky
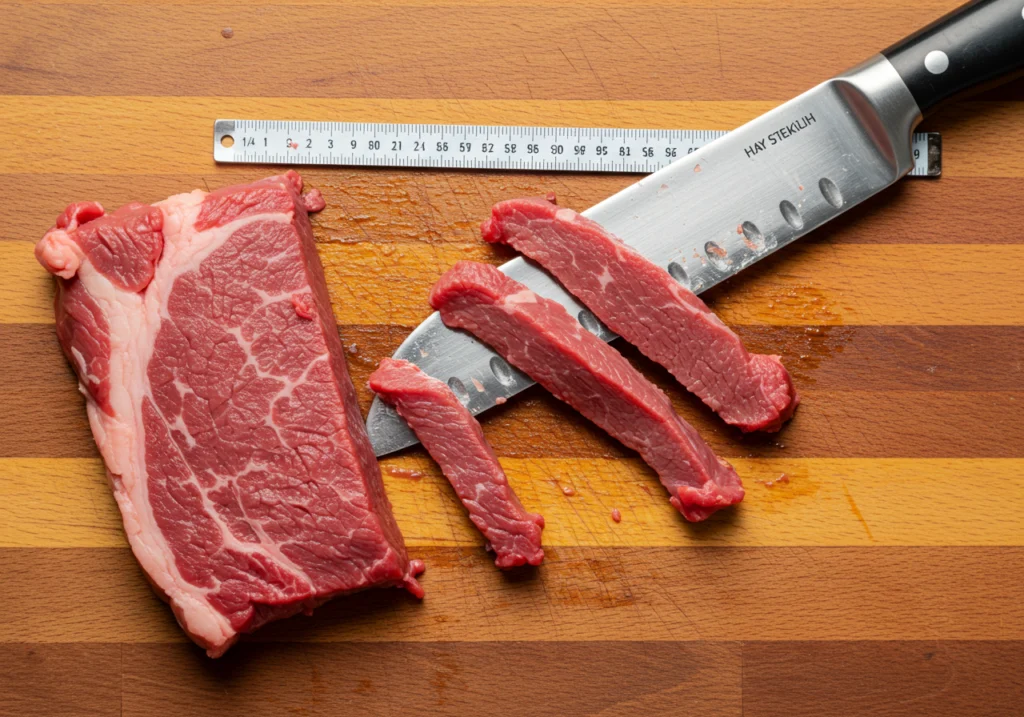
Okay, let’s talk meat selection because this is where most people mess up their beef jerky recipes right from the start. You need lean cuts – and I mean LEAN. Any fat on your jerky will go rancid faster than my kids can demolish a bag of the stuff. Trust me, I learned this the hard way with a beautiful marbled ribeye that seemed like a good idea at the time. Spoiler: it wasn’t.
My go-to cuts for killer jerky:
- Eye of round (my personal favorite – cheap and perfect)
- Bottom round (great texture, easy to find)
- Top round (a bit pricier but worth it)
- Sirloin tip (when it’s on sale)
- Flank steak (amazing flavor but costs more)
Here’s the game-changer tip nobody tells you: partially freeze your meat for about 2 hours before slicing. Not rock solid, just firm enough that your knife glides through it like butter. This is how you get those perfect, even slices without wanting to throw your cutting board out the window. I aim for 1/4 inch thick (about 6mm), though my husband prefers his at 1/8 inch because he likes it crispy.
And here’s where people get confused – do you cut with or against the grain? If you want tender, easy-to-chew jerky (perfect for kids or anyone with dental work), cut against the grain. Want that traditional, chewy jerky experience? Go with the grain. I usually do half and half because I can never decide.
According to beef cutting guides from Beef It’s What’s For Dinner, these lean cuts typically have less than 10% fat content, which is exactly what we’re after for jerky that’ll last.
The Classic Original: Your Gateway Jerky Recipe
Let me share the recipe that converted my kids from begging for store-bought to refusing anything but homemade. This classic beef jerky recipe is simple, foolproof, and absolutely addictive. It’s the one I make when I need a sure-fire hit at potlucks or when bribing my brother to help me move furniture.
The Marinade:
- 1/2 cup soy sauce (I use low-sodium because regular is salt overload)
- 1/4 cup Worcestershire sauce
- 2 tablespoons brown sugar
- 2 teaspoons black pepper (freshly cracked if you’re fancy)
- 1 teaspoon onion powder
- 1 teaspoon garlic powder
- 1 teaspoon smoked paprika (this is the secret weapon)
- 1/2 teaspoon red pepper flakes (optional but recommended)
- 1 tablespoon apple cider vinegar
Here’s what I do: whisk everything together in a bowl, taste it (yes, taste the raw marinade – it won’t kill you), and adjust. Too salty? Add a splash of water. Need more kick? Another pinch of red pepper. This marinade should taste strong – remember, it’s flavoring a lot of meat.
I throw 2 pounds of sliced beef into a gallon zip-lock bag, pour in the marinade, squeeze out ALL the air (seriously, all of it), and massage that bag like it owes me money. Then into the fridge for at least 8 hours, but 24 is better. I flip the bag every time I grab a snack from the fridge, which is… often.
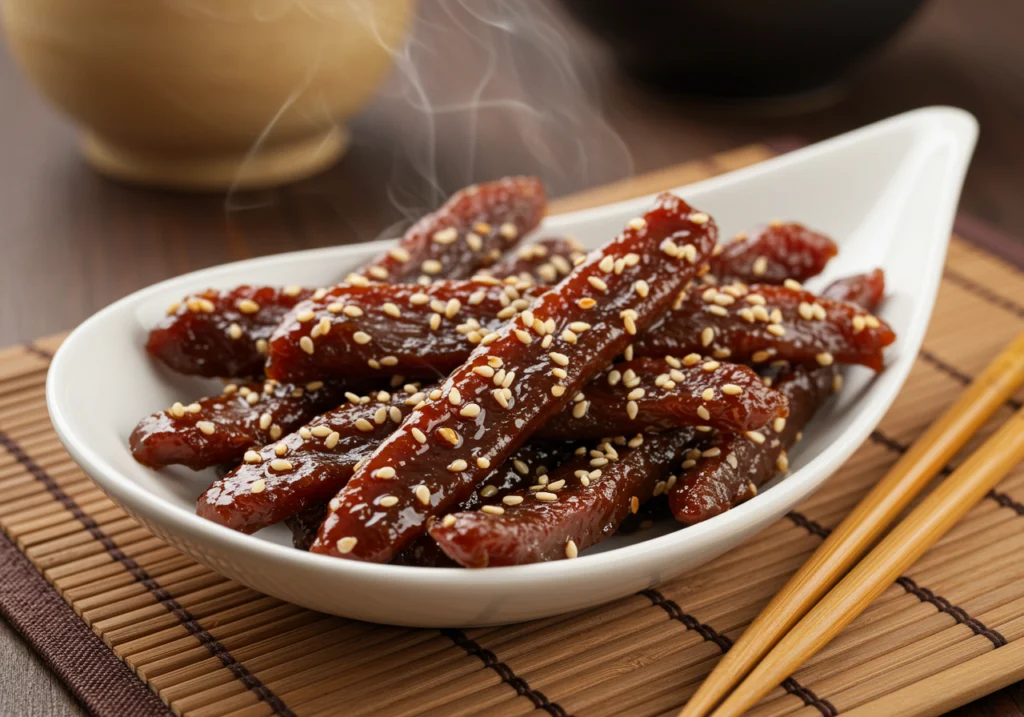
The Teriyaki Twist: Sweet Meets Savory
This one’s dangerous because it disappears faster than I can make it. My neighbor actually offered to pay me to make her a monthly batch after trying this teriyaki version. I might take her up on it.
Teriyaki Marinade:
- 1/2 cup teriyaki sauce (Kikkoman or homemade)
- 1/4 cup pineapple juice (the secret ingredient)
- 2 tablespoons honey
- 1 tablespoon fresh grated ginger (or 1 teaspoon powdered)
- 2 cloves garlic, minced
- 1 tablespoon sesame oil
- 1 teaspoon Chinese five-spice
- 2 tablespoons rice vinegar
The pineapple juice does double duty here – adds sweetness AND contains enzymes that tenderize the meat. Just don’t marinate longer than 24 hours with this one, or you’ll end up with meat mush. Ask me how I know.
Pro tip: sprinkle sesame seeds on the jerky during the last hour of drying. They stick to the slightly tacky surface and add this amazing nutty crunch. My kids call these “everything jerky” like everything bagels.
The Spicy Korean BBQ: Not for the Faint of Heart
This recipe came from my Korean mother-in-law, who laughed at my first attempts at “spicy” jerky. “This is spicy?” she said, eating three pieces without blinking. Challenge accepted. Now even she admits this has proper heat.
Korean BBQ Marinade:
- 1/2 cup gochujang (Korean chili paste)
- 1/4 cup soy sauce
- 3 tablespoons brown sugar
- 2 tablespoons sesame oil
- 1 tablespoon fish sauce (trust the process)
- 4 cloves garlic, minced
- 2 tablespoons grated Asian pear (or regular pear)
- 1 tablespoon gochugaru (Korean chili flakes)
- 1 teaspoon black pepper
The Asian pear is crucial – it adds sweetness and enzymes that tenderize. If you can’t find gochujang, authentic Korean ingredients can be found at H-Mart or most Asian grocery stores. Don’t substitute with sriracha; it’s not the same flavor profile at all.
Warning: wear gloves when handling this marinated meat. I once rubbed my eye after handling a batch and genuinely thought I’d need medical attention. Also, open your windows when drying this one – the capsaicin in the air can make your whole family start coughing like they’re in a pepper spray factory.
The Smoky Cowboy: Campfire Vibes Without the Tent
This is my husband’s favorite – he claims it tastes like “camping without the mosquitoes.” I developed this recipe trying to recreate the jerky from this tiny smokehouse in Texas we visited on our honeymoon. Took me two years, but I finally nailed it.
Cowboy Marinade:
- 1/3 cup liquid smoke (hickory or mesquite)
- 1/4 cup bourbon (cheap stuff works fine)
- 1/4 cup coffee (cooled, strong brew)
- 3 tablespoons molasses
- 2 tablespoons smoked salt
- 1 tablespoon chipotle powder
- 2 teaspoons cumin
- 1 teaspoon dry mustard
The coffee might sound weird, but it adds this deep, rich complexity that makes people go “what IS that?” in the best way. Sometimes I add a tablespoon of instant espresso powder for extra oomph. The bourbon mostly cooks off, but it leaves behind this subtle sweetness that works perfectly with the smoke.
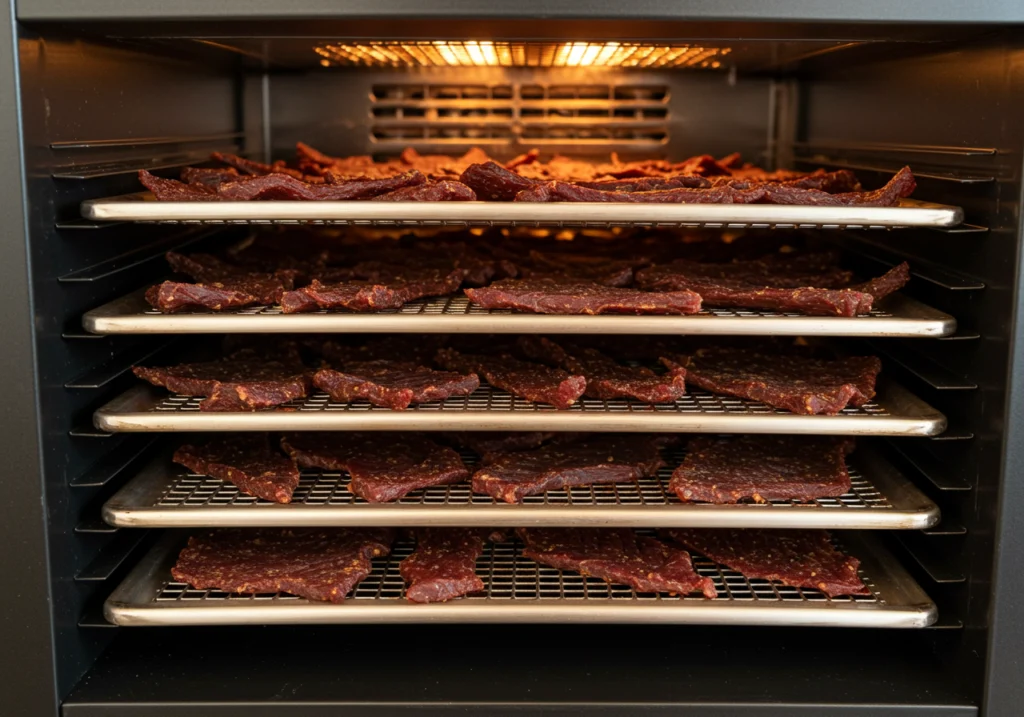
The Dehydrator Method: Set It and Forget It
So let’s talk drying methods. I’m a dehydrator girl through and through. Yes, you can use your oven, and I’ll explain that too, but a dehydrator changed my jerky game completely. I use a Excalibur 9-tray dehydrator, but honestly, even a basic $40 model works fine.
Here’s my dehydrator process:
- Pat the marinated meat completely dry with paper towels (important!)
- Arrange strips on trays with space between each piece
- Set to 160°F (71°C) – this is the safe temp according to USDA
- Dry for 4-6 hours, rotating trays halfway through
- Start checking at 4 hours – it’s done when it bends and cracks but doesn’t break
The biggest mistake I see? People overdrying their jerky until it’s basically meat cardboard. You want it dry enough to be shelf-stable but still have some flexibility. Think leather, not tree bark.
The Oven Method: For the Dehydrator-less
Before I got my dehydrator, I made hundreds of batches in my regular oven. It totally works; you just need patience and maybe a fan for your kitchen because it gets… aromatic.
Oven Instructions:
- Set your oven to the lowest temp (usually 170°F/75°C)
- Line baking sheets with foil, place wire racks on top
- Arrange jerky strips on racks (not touching)
- Prop the oven door open with a wooden spoon (crucial for air flow)
- Dry for 4-8 hours, flipping once halfway through
The wooden spoon trick is essential – without air circulation, you’re basically slow-cooking, not dehydrating. Your house will smell like a beef paradise, which is either amazing or overwhelming depending on your perspective. My dog literally doesn’t leave the kitchen when I’m oven-drying.
Storage Secrets: Making Your Jerky Last
Here’s the thing about homemade jerky – if stored wrong, it’ll either go bad or turn into jaw-breaking leather. After ruining several batches early on (including one memorable incident involving a moldy camping trip surprise), I’ve perfected my storage system.
Short-term storage (up to 2 weeks): Store in an airtight container or zip-lock bag at room temperature. Add a paper towel to absorb any residual moisture. I keep mine in a mason jar on the counter, but that’s mostly because it rarely lasts more than three days in my house.
Long-term storage (up to 6 months): Vacuum seal in portions and freeze. Game-changer tip: portion into single-serving bags BEFORE freezing. Nothing worse than wanting a quick snack and having to defrost an entire pound of jerky.
The moisture test: After your first day of storage, check for condensation inside the container. If you see any, your jerky needs more drying time. Pop it back in the dehydrator for another hour or two.
I’ve also started using food-grade silica gel packets (the same ones in vitamin bottles) for longer storage. Just make sure they’re food-safe ones, not the industrial kind. This has extended my jerky’s life significantly, though honestly, finding jerky that’s been around long enough to test long-term storage is rare in my house.
Pro Tips That’ll Level Up Your Jerky Game
After five years of jerky obsession, here’s what I wish someone had told me from the start:
• The pre-freeze trick: Beyond easier slicing, partially frozen meat absorbs marinade better. Science? Magic? Who knows, but it works
• Double-bag marinating: Put your zip-lock inside another bag. I’ve had too many leaky bag disasters to risk it anymore
• The bend test: Perfect jerky bends and shows white fibers when bent, but doesn’t snap in half
• Uneven pieces are fine: Don’t stress about perfect uniformity. Thinner pieces get crispier, thicker ones stay chewier – variety is good!
• Save the marinade: Boil leftover marinade for 5 minutes and use it as a glaze for the last hour of drying. Extra flavor bomb!
• Ground meat jerky: Mix ground beef with spices, use a jerky gun. Totally different texture, kids love it
• The cure debate: Some people swear by Prague Powder #1 for safety. I don’t use it, but if you’re paranoid about bacteria, research it
• Batch cooking: I make 5-10 pounds at once. Same effort, way more jerky. Future you will thank present you
Troubleshooting Your Jerky Disasters
Let’s be real – you’re going to mess up some batches. Here’s how to fix common problems:
Too salty? Soak finished jerky in cold water for 30 seconds, pat dry, re-dehydrate for an hour. Reduces salt by about 30%.
Too tough? You over-dried it. Try steaming it over boiling water for 30 seconds to soften slightly. Or just tell people it’s “extra chewy artisan style.”
Moldy after storage? Not dry enough initially, or stored while warm. Always cool completely before storing. When in doubt, freeze it.
Tastes bland? Your marinade was too weak, or you didn’t marinate long enough. Next time, reduce marinade by half on the stove before using for concentrated flavor.
Inconsistent drying? Your slices were different thicknesses. Invest in a meat slicer if you’re serious, or practice your knife skills.
Burns your mouth but doesn’t taste spicy? Too much black pepper or dry spices. They intensify during drying. Cut back by 25% next time.
Why Homemade Jerky Is Worth the Effort
Look, I get it. You can buy jerky at literally any gas station. But here’s why I’ll never go back to store-bought:
First, the cost. I calculated it out – my homemade jerky costs about $8 per pound. The fancy stuff at Whole Foods? $40+ per pound. Even the gas station stuff is $25-30 per pound. My kids’ jerky habit was going to require a second mortgage before I started making it myself.
Second, you know exactly what’s in it. No MSG if you don’t want it. No random preservatives. No sugar if you’re keto. My diabetic father can finally enjoy jerky again because I make him sugar-free batches.
Third, and this is the big one – it just tastes better. Like, incomparably better. Once you’ve had properly marinated, perfectly dried homemade jerky, the store stuff tastes like salted cardboard. My mail carrier actually asked if I’d started buying from a different brand because the smell from our packages had changed. Nope, just finally figured out how to make the good stuff myself.
Wrapping Up Your Jerky Journey
Making your own beef jerky recipes at home is one of those skills that seems way harder than it actually is. Sure, my first few batches were… educational. But once you get the hang of it, you’ll wonder why everyone doesn’t make their own. The process is forgiving, the results are incredible, and honestly, there’s something deeply satisfying about turning a cheap cut of beef into something people literally beg you to make for them.
Start with the classic recipe – it’s foolproof and will give you confidence. Then branch out. Try adding coffee grounds to your marinade, or experiment with different hot sauces. Make a batch with fish sauce and lemongrass. Go wild with za’atar and sumac for a Middle Eastern version. The worst that happens is you make mediocre jerky, which is still better than most store-bought options.
My advice? This weekend, grab 2 pounds of eye of round, try the classic marinade, and just go for it. Clear your counter, set up your dehydrator or oven, and embrace the process. Your future snacking self (and probably everyone you know) will thank you.
Have you tried making jerky at home? What’s your secret ingredient or favorite flavor combo? Drop a comment below – I’m always looking for new ideas to test, and my family is always willing to be taste testers!